Total Pageviews

Search This Blog

Sunday, February 26, 2017

1806 Prussian and French Napoleonic Slug Fest


The crossroads of Brentwaldstadt were abandoned as two great armies approached to decide the fate of the once mighty Prussian state.  Frederick the Great was long gone and at the head of Prussia's armies was the elderly General Hohenlohe von Crenshaw.  While the Prussian army was larger, the out dated command structure and musket drills shackled the Prussian forces.  Nonetheless the Prussians moved aggressively into battle, seeking a delaying action on their right and a decisive clash on their left.  The main battle line on the left was supported by horse artillery and Colonel Von Blucher, leading his famed Red Hussars, while on the right, light infantry and jagers quickly occupied the woods opposite Brentwaldstadt with Von Beeren's heavy cavalry, the corp artillery, and a Saxon regiment in reserve.


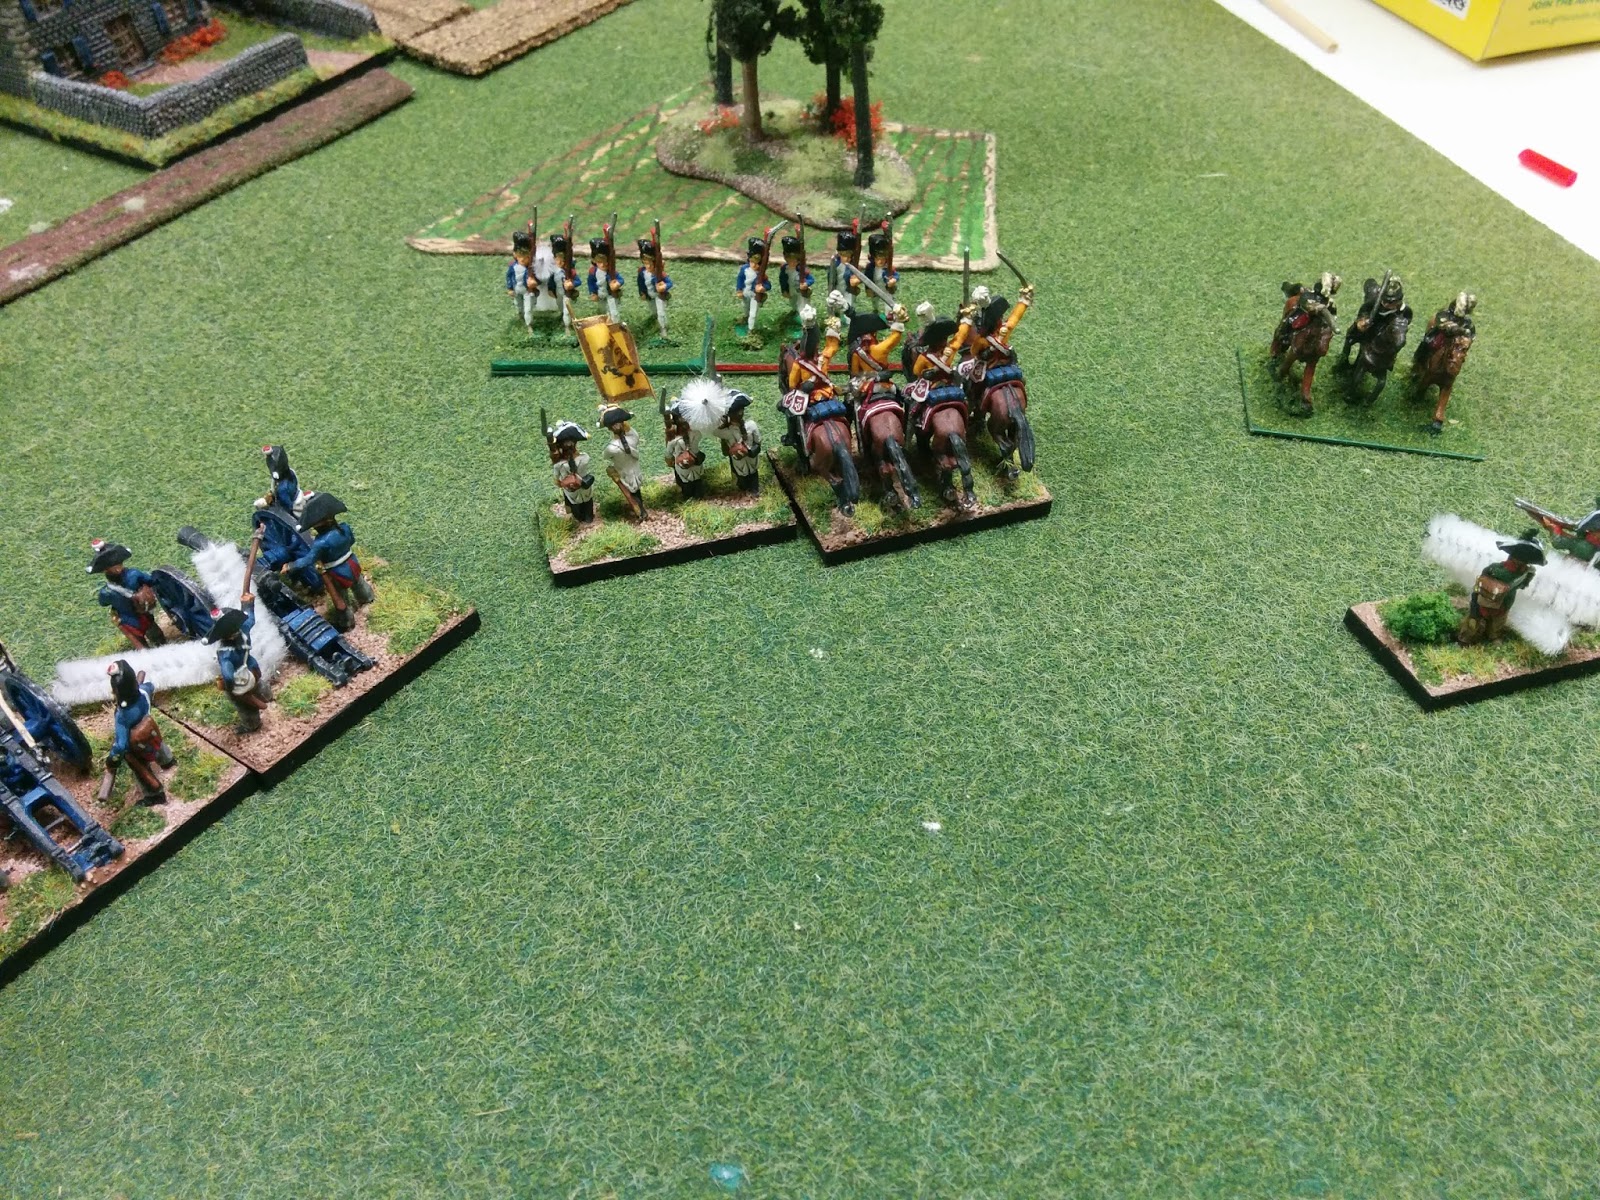
The view from the Prussian left as the main battle lines approach.  The French, with two regiments of elite grenadiers and supporting fusiliers have taken up a strong defensive position on the heights outside of Brentwaldstadt.


The Center - The Prussian and French corp artillery were engaged in fierce counter battery fire for most of the game, only occasionally being able to fire at more vulnerable infantry targets.  Note the Prussian jagers and light infantry moving into the wood to engage the French legere who have taken a defensive posture inside the walls of Brentwaldstadt.


As the lines approach, one regiment of Prussian infantry, suffering heavily from the French guns, was forced to retire behind the main assault.  The horse artillery on the left has already chased one regiment of French Fusiliers from the field, forcing the French to either stand in their defensive position and take a withering fire, or advance on the Prussian lines.

While the struggle continues on the left, the French legere on the right has stormed the Prussian positions in the woods and cleared the Prussian skirmishers, and are now advancing on the Saxons and corp artillery.  Only Von Beeren's heavy Cuirassiers remain as a substantial obstacle to the French advance.


Dire situation on the Prussian right.


Von Beeren leads his cuirassiers forward accompanied by the untested Saxon allies, leaving the shaken Prussian jagers vulnerable to the curved sabers of the French hussars.


The French, unwilling to stand in the face of artillery fire, charge off the hill and engage the Prussians at close range.  In desperation the horse artillery is ordered to defend their position, and though they have initial success with the aid of the Red Hussars charging the flank of the French line, the French squares prove too much and deliver staggering volleys into the glorious Red Hussars, chasing them from the field.  The horse artillery though valiant to the end also succumb to the French charge, but a final crash of Prussian musketry shatters the French line leaving both side exhausted.  It is still very much an undecided contest, but both sides are at the breaking point.


The French gather themselves and despite exhaustion and depleted ammunition stores, storm the Prussian left in a flank attack.  Undeterred the Prussians turn to face the attack, and despite being outnumbered 2 to 1, the Prussians hold, leaving the remaining French regiment and core artillery vulnerable to a counter attack.


Everything is hanging in the balance.  The Prussians have held the French, but their counterattack will be a desperate gamble.  Just as the Prussians are gathering themselves for the final assault, a tremendous explosion rent the air around Brentwaldstadt.  A stray French shell landed in the caissons of the Prussian artillery, with the resultant explosion heard all the way down the road in Auerstadt, ten kilometers away.  Prussian Gunners and horses are ripped apart in a grisly scene from some hellish nightmare.  What is left of the artillery abandons their position, and the Prussian General Hohenlohe von Crenshaw, seeing his artillery flee the field decides his armies position is untenable, and rides out to meet Field Marshal Cliffel and surrender his sword, lest his army is utterly destroyed.

The battle presented here was played using a DBA variant called DBN written by Alex Testo and Bob Carter.  It is available as a download here:  http://www.dbnwargaming.co.uk/
The troops are 15mm miniatures played on a 30" square board.

Monday, August 22, 2016

Recents Works in Progress - a Varied Collection


Some spotters cleverly concealed in the field of my paint blotches.  They will compliment my growing Waffen SS army for Bolt Action.  You can see below a 105mm Howitzer in need of some front line assistance.


 The artillery is a 105mm Howitzer from Warlord Games, the instructions for assembly were never discovered on their site.  I found the assembly instructions for just about every other artillery piece they make, but this one remained a mystery.  I only hope I didn't put something on upside down!


The sandbag emplacement and the sandbagged ammo storage are pieces made by Baueda.  The other scenic pieces came with the gun.


This was a fun discovery to make.  I have been watching HBOs Rome this week, so was inspired to revisit my pile of unpainted lead and found these gems by Testudo Miniatures.  The Marian Romans in the 3.0 version of DBA are now allowed artillery, so I thought I would paint them up.


 I took these Samurai (and a lot more of their buddies hiding in a box) as trade for selling off a bunch of stuff for a friend, and decided to spruce them up and base them for L'art de la Guerre.  They have a good basic base coat, albeit with some fairly odd color choices for the armor.  I've had to add back banners, swords and arrow bundles, as well as work on the highlighting and other detailing to add some depth.  Three units done and about 15 more to go....


Lastly we have some French Dragoons in 1812 uniforms being painstakingly painted.  There is so much detail in these old metal foundry sculpts - probably not as nice as the new Perry sculpts, but their older work is nothing to sneeze at!  I have three different regiments being prepared for a Napoleonic variant of DBA that is just elegant and wonderful.  DBN - http://www.dbnwargaming.co.uk/  I really do love these rules when played with the optional rules for attrition.

Sunday, March 27, 2016

Islamic Berbers Light Cavalry and Ben Yusuf


This is the various light horse elements for an Islamic Berber army in Spain, with added elements to make it more appropriate for an Islamic army during the crusades in the Middle East.


Ben Yusuf (of El Cid fame) as a light horse general.  The standard is taken directly from the movie, but I must extend my apologies for the Islamic script, as it is an approximation only and more likely resembles a kindergartner's scribbles than any actual phrases.  The figure for Ben Yusuf is actually an Ottoman Turk commander from the Condottieri range.  I added the veil and modified the robe a bit to look more appropriate for the earlier period.


The standard bearer is a converted Turcoman with an added turban and veil


Here we have some Ral Partha Moors.  The sword has been re-positioned into more of a thrusting attack which makes the figure a bit more dynamic.


Another example with the sword in the original position.  The highlighting on the horse in the foreground is a bit heavy handed in this case.  I will admit to struggling with black, especially when there are no clear highlight and shadow areas such as this horse whose musculature is not well defined.


Here I have an element made more for the Syrian desert than North Africa and Spain.  The shields are still of Spanish design, but gone are the black/navy robes of the Berber tribe.


I had a blast with the horse blanket on this figure and was very pleased with the result.


Turcoman light cavalry


Turcoman and tribal light archers.  These are actually Persians that I have converted with head swaps or turbans and veils made out of green stuff.

Sunday, February 28, 2016

HotT Undead Halloween Army


For this year's Halloween in April HotT meet, I wanted to paint an original army, but also wanted something very simple that would not require a lot of time - hence the green or gray color scheme with a few diluted washes or dry brushed colors added for accent work.  Here the dead rise from the ground in the stronghold of the necromancer.


A pair of ghostly fliers hovering over the battlefield, their passage gathering the mists below creating a chill cloud upon which they appear to float.


Werewolves have been recruited by the necromancer for their strength and viciousness and may be the only living servants able to tolerate the presence of the necromancer. 


The hero leader of the undead horde mounts a small mist covered rise to view his army on the march.  The mist was made using polyfill, which was glued and then sprayed to help hold it in place.  The polyphil works reasonably well as a representation of mist, though when enlarged in the photographs the individual fibers become more apparent and it looses some of the effect.  On the battlefield at 15mm size it works fairly well.


The headless horseman.  His substitute pumpkin head was sculpted from green stuff.  The figure is from Splintered Light - minus his head.


The necromancer himself with a flaming sword and two of his ghastly minions.


The Barker Marker.


Knights and riders of the ghostly horde.  The bulk of the army is made from Baueda's Emishi line (proto-samurai).  As much as I love Baueda and some of their later figure lines, the Emishi were just butt-ugly.  I knew I was never going to take the time to actually paint them, so using them in this manner actually allowed me to not just melt them down for fishing weights.


The shooters


The spearmen are actually made from archers.  Many of the archer poses in this line were so awful, I decided to simply cut down the bow arm and disguise the surgery under a shield.  The spears were then placed in the right arm which was bent in the position of drawing a bow in most cases.  To disguise the transition from arrow hand to spear, I sculpted some rudimentary hands with liquid green stuff over the spear shaft so that it would appear less like the spears were floating on their bodies.  Not perfectly executed by any means, but for a super quick army presented in mass it works.


The ghastly army arrayed for battle.

Kings of War Undead


Skeleton archers made from a mix of Mantic skeletons, and mostly Wargames Factory skeletons.  The WF skeletons are delicate little guys, but I love the look.  I have mounted them on bases 3 or 4 to a stand so that the majority could be taken off the movement stand and used for Hordes of the Things.


Another unit of skeleton archers.


The movement bases are made from thin plywood with a balsa wood lip around the edge.


A regiment of skeletons.  I made the movement trays to hold a troop, so that I can field these as two troops or a regiment depending on my need.


A battery of balefire catapults.  I painted these, as well as the rest of the units, already mounted to their bases using mostly thinned washes of color to speed the process.


A regiment of wraiths in their baleful green.  These were fun and obviously very easy to paint.

10mm ACW Union Army - the Beginning


The genesis for this project started as a lot of my projects do, with a bargain at a flea market.  I got a bunch of GHQ 10mm ACW figures for $5 - I won't say how much that initial investment has blossomed, but I will say that the plank Road and Cracker line 10mm lines are wonderful!


I am basing these for a DBA variant called appropriately DBACW.  The supply wagon and artillery train elements serve as either base camps or forward supply depots.


Even corp commanders have to use the privy just like everyone else.


Each artillery piece comes with a choice of barrels.  So far I have stuck to bronze howitzers primarily, but need to learn a bit more about civil war artillery to give a better representation of all of the arms used.


The firing line - I painted these figures on the base which helped speed things along.  Union troops having a somewhat unified look made this an easy approach.  I hope I don't regret it when it comes to painting the confederates!