Total Pageviews

Search This Blog

Monday, September 28, 2020

Rolica 1808 - Disaster!

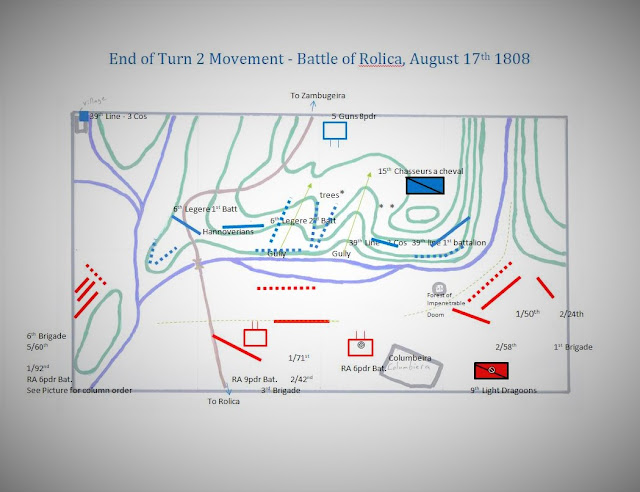
  The British and French armies come to grips with each other, with both sides fully committing to an all or nothing struggle for control of the hill.  As the armies clash, twin disasters of monumental proportion develop on both sides of the field.


On the British left, the 42nd charges up the main road to drive out the what remains of the 6e Legere.  The track is narrow and the 42nd struggles to maintain cohesion as they charge.  Though the casualties they sustain in the charge are trifling, the highlanders arrive exhausted from their charge, and Napoleon's finest - veterans to a man, stand firm.  Vive l'Empereur echoes in the small clearing and the highlanders are thrown into confusion, but they refuse to abandon their hard won gains and remain toe to toe with the hated French legere.

Lt. Colonel Robert Macara attempts to rally his troops as the french bayonets push inexorably forward...


Even more disturbing, the Hanoverians have formed an attack column and threaten to charge the 42nd in the flank.  The threat of the twin pincers is too much and the Black Watch breaks into a full rout!

Lt. Colonel Macara tries valiantly to halt the rout as the highlanders of the Black Watch stream down the hill, pursued by the French, despite the protests of their regimental commander that they hold their ground.  Their blood is up and there is no stopping the pursuit.

The field is littered with the bodies of both British and French - a grim testament to the fierceness of the struggle.

The French Colonel was right to try and contain the eagerness of his victorious troops.  Even as the 6e Legere pursues the defeated highlanders, another famous battalion of Scotsmen, the 92nd Gordon Highlanders, prepare to charge into the woods.

Suddenly an enormous drooling cock-eyed slug and a ferocious dire wolf appear to *&&%$#!! time machine - must have slipped into inter-dimensional mode again - hold on, whack, OK - back to the battle at hand...


While the Hanoverians prepare to move into the clearing vacated by the 6e Legere, they risk being flanked by the 71st (more damnable highlanders!) approaching uphill through the dense scrub and woods.  The climb will slow them but not the Voltigeurs.  The last two seen in front of their right flank are cleared from the hillside by a well timed volley.

On the British right the second of the twin disasters unfolds, but this time the victim is the French.

The 24th climbs the steep hill in good order, aiming to hit the 39e Ligne at the extreme end of their line.  The 39th reacts quickly, but in the effort to adjust their line a gap appears and the companies lose cohesion.  The 24th hits the line and pours through, pushing the 39e into total disarray. The regulars of the 39e, unlike the veteran 6e Legere, panic and flee up the hill with the 24th on their heels.

The 24th, elated at their victory, follow the 39e Ligne up the hill and out of the woods, right into the waiting chasseurs a cheval.  The chasseurs charge, but the cool headed British, trained and drilled by their NCOs relentlessly, form square in the nick of time and send a crushing volley into the French cavalry.  The chasseurs flow around the square taking even more casualties and are routed by the solid resistance of the British square.  The 24th has sustained minimal casualties and in the course of a few minutes has sent two French units streaming to the rear!
 

To make matters worse for the French, the 50th has formed up and prepare to join the 24th at the top of the hill.  Only the sound of desultory musket fire on their right concerns them.

 
To the right of the 50th, a small unit of British skirmishers holds a much larger French force of skirmishers at bay.

As the French cavalry and remnants of the 39e Ligne stream to the rear, an under strength battery of 8 pounders has limbered up and is positioning to help stem the British advance and serve as a rally point for the French, where their brigade commander is endeavoring to halt their rout.  

The aim of the French is to delay the British assaulting the hills to buy time for the French army assembling in the South.  Historically the French took heavy casualties but were able to withdraw in good order.  While the French have delayed the advance of the British in this scenario, they are in danger of being cut off from withdrawal by the 5/60th rushing through the woods to occupy the main road behind the French position.  It's a race to the finish - Can the French hold out for three more turns...

Wednesday, September 16, 2020

Rolica 1808 - The Assault!

 The long distance battle with Wellington Man in New Zealand continues unabated with a storm of emails, maps, and photos detailing the movement of the troops.  The French, secure in their strong defensive position, have had a rude awakening from the British canon and clouds of riflemen swarming over the approaches to the hills.  All along the line the French are feeling the pressure of the advancing British, with columns storming up the hills while riflemen and close order battalions in firing line continue to hurl death and destruction into the French ranks.

The British Far Left:

The brave French on the British far left hurl themselves out of the village and attempt to form column, daring the withering fire of the riflemen and into the looming destruction of a battery of 6 pounders being manhandled into position to hurl certain destruction upon them.  If not for the action of their defiant attack however, those very guns would have been pouring roundshot into the flank of the 6th Legere, barely visible in the background.

The 5/60th American rifles and a battery of Royal Horse Artillery punishing the 3 companies of the 39th French line's 2nd battalion who had been detached to hold the village at the edge of the battlefield, against the inevitable appearance of one of the British flanking columns approaching in the distance.

The morale marker and a full company and a half of toppled soldiers tell the story of their sacrifice.

The British Center Left

The 42nd, under the watchful eye of Lieutenant Colonel Robert Macara, form column on the main road leading up the hillside.

To the left of the 42nd, and separated from them by a spur of the hillside, the 92nd prepares to advance up the hill in firing line led by Lieutenant Colonel John Cameron.  The advance is a tortuously slow process given the difficult terrain.

Waiting for the 42nd and 92nd Highland battalions on the spur of the hill, is the 1st battalion of the 6th Legere.  Casualties from artillery and the ever present riflemen are already being felt as the 6th has lost more than a quarter of their strength as they retreated further into the relative safety of the deep wooded slope.  More skirmisher from their second battalion are hurrying into position to protect their flank from those pesky British rifles!

The 42nd crosses the bridge, closing to within near charge distance of the 6th legere.  Only a thin line of French skirmishers stands in their way, but already the 42nd has begun taking casualties.

The pincers of the British attack on the 6th Legere close in!

The British Center

Yet another battery pounds the French forces as the 71st light infantry advances in the center.

Only two and a half companies of the French 39th Regiment's 2nd battalion hold this sector of the field, and the British canons have made their presence known, disordering the regiment as the 50th prepare to assault.  The Chef de Battalion is desperate to rally them before the assault, but the courage of his infantry hangs on a knife's edge (or the roll of a six sided die as the case may be).

To bolster their courage, two skirmishing units of the 6th Legere's 2nd battalion have left the cover of the woods to pour fire into the flanks of the approaching British firing lines.  Suddenly the hot blood of the French voltigeurs turns to ice as the sound of hoof beats reverberate in the distance.  Felt more than heard, there can be no doubt as to the approach of what they fear most - the dreaded light dragoons.  Sabers glinting coldly in the smoke filled air bring a promise of death.

The open center of the battlefield, a perfect hunting ground for the fast moving horses of the British 9th Light Dragoons.  

Sound the charge! - Doh! The thunderous sound of all the horses must have knocked off the camera of the way back machine again.    

In order to reach the skirmishers however, the dragoons will have to pass through an open field covered by french artillery on the hill above, whose accurate fire has already taken out two of the guns of a British battery in the center.

The British Right

The British pressure on the French line is relentless, nowhere more so than on the British right flank where the 24th and 58th regiments are attempting to dislodge the 1st battalion of the French 39th line regiment

The 24th storms up the hillside in an attack column.  The French are taken unawares by their rapid advance and unable to bring all of their muskets to bear on the British column, as the woods and the curve of their own line obscure the attacking column from sight.  The 24th endure trifling casualties, but now must face the point blank fire of the French as they close with them.  The French hold the higher ground, but the British are highly trained and full of confidence in their own native superiority.  For King and Country!  The Cry goes up and the 24th make the final push up the hill....

As the 24th assaults the left of the French Line, the 58th pours a galling fire into the woods, continuing to make the French pay for holding their line on the hillside, but is it enough?      

While it is looking grim for the French, historically speaking Rolica was designed as a delaying action to buy time for the French armies in the area to assemble.  From a game's perspective, this scenario was originally conceived as an eight turn game, with control of the road leading from the rear of the French the key victory condition, the game may need to be extended to give the British a fighting chance of taking the road in time.  On the other hand, the eight turn limit might force the British into more ill timed column assaults as actually happened.  In any event this brings an end to turn 5.  Tune in next time for the resounding clash of arms as the columns hit their targets, and the sabers of the cavalry are drawn.


Saturday, August 29, 2020

Rolica 1808 - Preparing for the Storm!

The battle begins on the slopes of the hills to the South of Rolica, just by the small Portuguese village of Columbeira.  The small French force of five battalions has occupied a line of hills covering about a mile, in the hope of delaying or stopping the British advance on the French main force, still gathering miles to the rear.  Lord Wellesley, the future Duke of Wellington, is fresh off the boat and leading his small allied army into Portugal to chase out the hated French.
 
https://www.britishbattles.com/peninsular-war/battle-of-rolica/ 

Turn 1
 
The left flank of the French army has taken position in low lying trees and scrub along the cliff like slopes above a small stream bed

The British view of the battlefield from the center of their position.

Turn 1 sees some initial jockeying of position as the British brigade on their right flank prepares for an assault.

In the center the British battalions spread out and deploy their artillery to take advantage of their 3 to 1 advantage in heavy ordinance.

A bird's eye view of the British center

As turn 2 begins more British forces will come on to the field to put pressure on every point of the French defensive line!

A battalion of French Legere rushes to meet the threat on their right!

The French left will be a tough nut to crack!

TURN 2

On the British Right the combined light companies of three full line battalions attempt to soften up the French line, but the voltigeurs, crouching behind granite boulders and low scrub, send back a hail of lead inflicting significant casualties on the advancing light companies.

In the centre, the gallant French have unwisely advanced beyond the shelter of the woods in order to engage the advancing British light companies.  Evenly matched the British and French open a galling fire on each other, but the French, having to source their powder from inferior Spanish mines, have trouble and their guns sputter.  The pride of the French army in Spain, the elite voltigeurs of the 6e Legere, are shot to pieces losing a third of their strength.  It is conceivable that I uttered a few choice words as I rolled to inflict casualties on the British and missed in every instance!

On the British left the tragedy for the French continues.  The British rifles from the 5/60th have combined with the light company of the Gordons to root the French out of the wooded salient they have occupied.  The extra range of the rifles let's them pour fire on the French in relative safety while the French voltigeurs are decimated, losing a third of their strength in the initial exchange!  A few more choice words were uttered as I rolled to save the French from the damnable British rifles - so many ones and twos have rarely been rolled all at once!

Suddenly the ground shook - "Well that starts the ball!", the future Iron Duke exclaims to his staff.

KaBoooom!  British 9 pounders thunderously open up on a half battalion of the French 39e Ligne sheltering in the woods.  The concussion is so great it finally shakes the recorders of time machine reporting on these events back into colour!

Despite the protection of the rocks and woods, the British artillery is well sighted and the first casualties against a main line Battalion are sustained.  The French chef de Battalion looks on nonchalantly, confident in his men's ability to stand the fire and repel the oncoming British

Sir Arthur Wellesley is joined by his aide and the Brigade Commander General Howard, as well as the battalion commander of the 5/60th Lt. Colonel Williams, who has galloped to the centre to report on the advancing left flank and the disposition of the French in that sector of the field.

This has been an enjoyable battle and so far managing the turns via email and an interactive map has worked well, an example of which is below:


Friday, August 21, 2020

95th Rifles and Foot Artillery Added to the Fray!

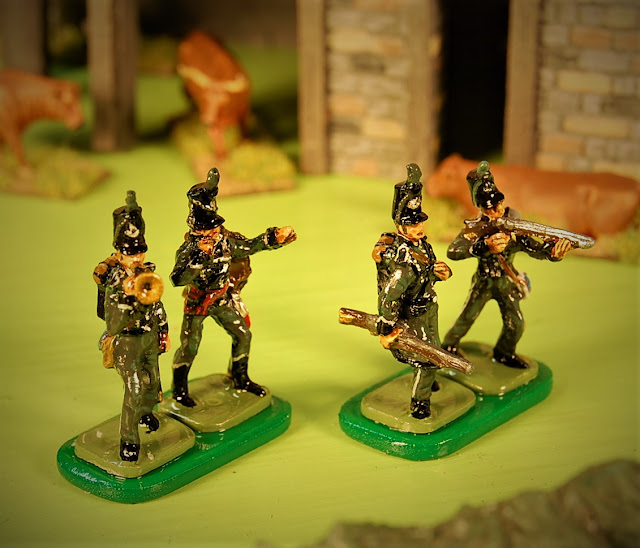
 I recently added twelve standing firing riflemen to the 95th Rifles regiment.  Originally painted by Dick Tennant as a battalion of 24, I wanted to bring them up to their full strength of 36 figures.  They will then be distributed throughout the corps in companies attached to the various brigades to provide a screen of effective light infantry skirmishers.  For the upcoming battle of Rolica about half the battalion strength was present, along with the full battalion of the 5/60th rifles.

Here we catch a rare glimpse of British riflemen falling back from the enemy.  This would never happen under normal circumstances as the BBC would have us believe that 6 riflemen under the command of Richard Sharpe could change the direction of any battle!  Just don't get on his bad side: https://www.youtube.com/watch?v=tE8d-uGmIWk

Yet another improbable facing, as the 95th would be preparing to haul away that livestock I am sure!  The prone firing figure made for some interesting choices for the basing, but in the end I liked the look of a mixed larger base with a variety of poses for this famous unit.  It makes them special and easy to distinguish on the field of battle.

The prone and kneeling figures are original Hinton Hunt figures painted by Mr Tennant with some additional detailing added.  The standing firing figures are Der Kriegspieler copies that were painted to match the work of Dick Tennant by yours truly.


A misbehaving NCO about to secure some dinner for his company...


Command figures.  I'm still debating whether to add a mounted colonel.  Since they were typically detached and spread out through the corps, I'm not really sure how useful it would be to add the Colonel.

From this picture it is easy to see how much smaller the DK figures can be in comparison to their Hinton Hunt brethren.  In some cases it's not too bad but here, the standing firing figure looks quite diminutive iin comparison to the Hinton Hunt figure running at trail.

Even the Major is hungry apparently...


I also finished up this British foot battery.  Dick Tennant did a superb job on these and I really did very little other than a bit of shading and highlighting, before basing them and giving them the ole gloss coat.

While I have six gunners, really only four are needed in the rules system I am using.  Each figure represents one manned gun and the gun itself represents two.  After all of the crew figures are wounded and the strength of the battery reduced to just the model of the gun representing the final two guns and crews, it is removed from play.

The gun itself is a delightful model and a very hard to find example of Hinchliffe's 20mm line of artillery pieces.

Lastly I wanted to send a shout out to Ian at SHQLTD.  The SHQ / Kennington figures are nicely sized to be compatible with Hinton Hunt figures.  Ian has given me top notch service and I would encourage folks who are not familiar with the line to give them a try.  Below are some Brunswick Oels riflemen conversions from SHQ figures with Der Kriegspieler heads.  The officer is an SHQ Brunswick lieb Infantry officer I believe.  I have some British artillery on order so will let folks know how they compare when they arrive.

The bases of the SHQ / Kennington figures tend to be a little narrow so I expanded them out with epoxy putty to be more along the size of Hinton Hunt bases.

A fuzzy little phone picture, but hopefully shows the nice proportions of the SHQ / Kennington British mounted Peninsular officer.  I will use these as mounted colonels and are in my mind far superior to the Newline Designs 20mm mounted officers and more in line with Hinton Hunt proportions.

Similarly a very nice SHQ / Kennington French mounted colonel